Drawing Bounding Boxes in Python
Introduction to OpenCV bounding box
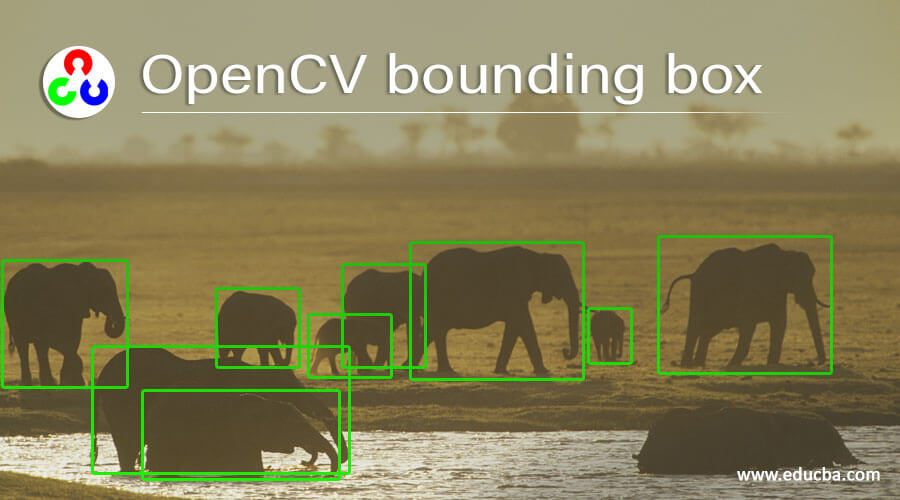
An imaginary rectangle around a given object that serves as a region of interest in the given image is called a bounding box and these rectangles tin be drawn over an epitome using information annotators past defining the 10 coordinate and y coordinate of the region of the interest in the image and to draw a bounding box on a given image, we make use of a function chosen selectROI() function in OpenCV using which a rectangle can exist selected in a given image and so the rectangular region can exist cropped and just the cropped paradigm from the given epitome can be displayed.
Syntax to define selectROI() Function in OpenCV:
selectROI(source_image)
Where,
- source_image is the image on which the rectangular region tin can be selected, cropped and the cropped image can exist displayed as the output on the screen.
Working of selectROI() Office in OpenCV
- The bounding box is an imaginary rectangle drawn around a given object and it serves as the region of interest.
- To draw a bounding box effectually an object in the given image, we brand employ of a function called selectROI() function in OpenCV.
- The image on which the bounding box is to be fatigued using selectROI() part is read using imread() function.
- The selectROI() part is used on the input epitome past passing it every bit the parameter to the selectROI() function to select the region of interest past cartoon a bounding box around the required object.
- The selectROI() office returns an image past allowing u.s. to depict the bounding box wherever necessary.
- Then the image within the bounding box fatigued using selectROI() function can exist cropped using imCrop() function.
- Then the cropped epitome solitary tin exist displayed as the output on the screen.
Examples of OpenCV bounding box
Given below are the examples of OpenCV bounding box:
Example #1
OpenCV program in python to demonstrate selectROI() role to draw a bounding box around a given object in the input paradigm and then crop the surface area within the bounding box and then display the cropped image as the output on the screen.
Lawmaking:
#importing all the required modules
                import cv2 every bit cv
                #reading the epitome on which bounding box is to be fatigued using imread() function
                imageread = cv.imread('C:/Users/admin/Desktop/educba.jpg')
                #using selectROI() role to draw the bounding box around the required objects
                imagedraw = cv.selectROI(imageread)
                #cropping the area of the image within the bounding box using imCrop() part
                croppedimage = imageread[int(imagedraw[1]):int(imagedraw[1]+imagedraw[3]), int(imagedraw[0]):int(imagedraw[0]+imagedraw[2])] #displaying the cropped image as the output on the screen
                cv.imshow('Cropped_image',croppedimage)
                cv.waitKey(0)
                cv.destroyAllWindows()
Output:
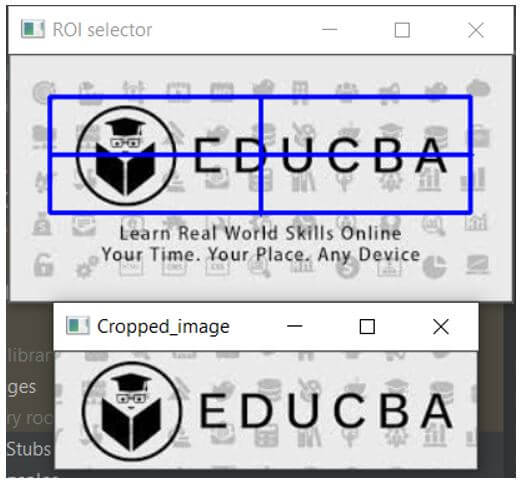
In the above program, we are importing the required modules. Then we are reading the paradigm on which the bounding box is to be fatigued using imread() function. Then we are drawing the bounding box on the required object in the given image using selectROI() function. Then nosotros are cropping the area within the bounding box using imCrop() function. Then we are displayed the cropped epitome every bit the output on the screen. The output is shown in the snapshot above.
Instance #2
OpenCV plan in python to demonstrate selectROI() office to draw a bounding box effectually a given object in the input image and then crop the area within the bounding box and then display the cropped image equally the output on the screen.
Lawmaking:
#importing all the required modules
                import cv2 every bit cv
                #reading the image on which bounding box is to be drawn using imread() function
                imageread = cv.imread('C:/Users/admin/Desktop/plane.jpg')
                #using selectROI() function to draw the bounding box around the required objects
                imagedraw = cv.selectROI(imageread)
                #cropping the area of the image inside the bounding box using imCrop() function
                croppedimage = imageread[int(imagedraw[i]):int(imagedraw[1]+imagedraw[3]), int(imagedraw[0]):int(imagedraw[0]+imagedraw[ii])] #displaying the cropped image equally the output on the screen
                cv.imshow('Cropped_image',croppedimage)
                cv.waitKey(0)
                cv.destroyAllWindows()
Output:

In the above programme, we are importing the required modules. Then we are reading the image on which the bounding box is to be drawn using imread() role. Then we are cartoon the bounding box on the required object in the given prototype using selectROI() function. So we are cropping the area within the bounding box using imCrop() part. Then nosotros are displayed the cropped image equally the output on the screen. The output is shown in the snapshot to a higher place.
Example #3
OpenCV plan in python to demonstrate selectROI() function to draw a bounding box around a given object in the input epitome and and so crop the expanse within the bounding box and then display the cropped image as the output on the screen.
Code:
#importing all the required modules
                import cv2 as cv
                #reading the prototype on which bounding box is to be fatigued using imread() function
                imageread = cv.imread('C:/Users/admin/Desktop/car.jpg')
                #using selectROI() function to draw the bounding box around the required objects
                imagedraw = cv.selectROI(imageread)
                #cropping the expanse of the paradigm within the bounding box using imCrop() role
                croppedimage = imageread[int(imagedraw[ane]):int(imagedraw[1]+imagedraw[iii]), int(imagedraw[0]):int(imagedraw[0]+imagedraw[2])] #displaying the cropped prototype as the output on the screen
                cv.imshow('Cropped_image',croppedimage)
                cv.waitKey(0)
                cv.destroyAllWindows()
Output:
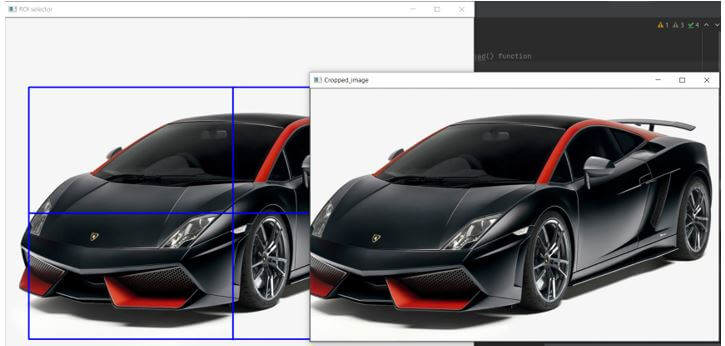
In the above program, we are importing the required modules. And so we are reading the epitome on which the bounding box is to be drawn using imread() function. Then nosotros are drawing the bounding box on the required object in the given image using selectROI() role. And then we are cropping the area within the bounding box using imCrop() function. Then we are displayed the cropped image as the output on the screen. The output is shown in the snapshot above.
Recommended Manufactures
This is a guide to OpenCV bounding box. Here we discuss the introduction, working of selectROI() function in OpenCV and examples respectively. Yous may also take a expect at the following articles to acquire more –
- OpenCV kmeans
- Python AssertionError
- Python Array Length
- Python IndexError
Source: https://www.educba.com/opencv-bounding-box/